Friday 30 November 2012

Sam Rig is DONE

So, after several different attempts at several face rigs that broke... it's DONE!

And the icing on the cake is... the way that worked in the end only took me 3 or so days. And that's with thinking time! So here's hoping the Ellie Rig'll take no more than 2 days.

So annoying that I've been hitting a wall with this for about 3 weeks, and suddenly it clicked. I mean, it's good that it clicked, but it took so long. Don't get me wrong, I do enjoy the learning process, but I don't really have time for it at this point!

I won't bore you with technicalities at this point, I'll just stick up a few pictures.
I'll try to put up a video over the weekend of the rig working!

Cheers!


Tuesday 27 November 2012

Waddles' finishing touches!

I call him Waddles, because i can really imagine him walkin' funny. But this should hopefully be one of the last modelling progress posts for Ellie's Monster, formally "Monster 2".
 On Chris' advice i bent the back knee a little to indicate the weight of the monster's flank on it. I also added more edge loops around the joints to ease rigging and weight painting.

Wings!
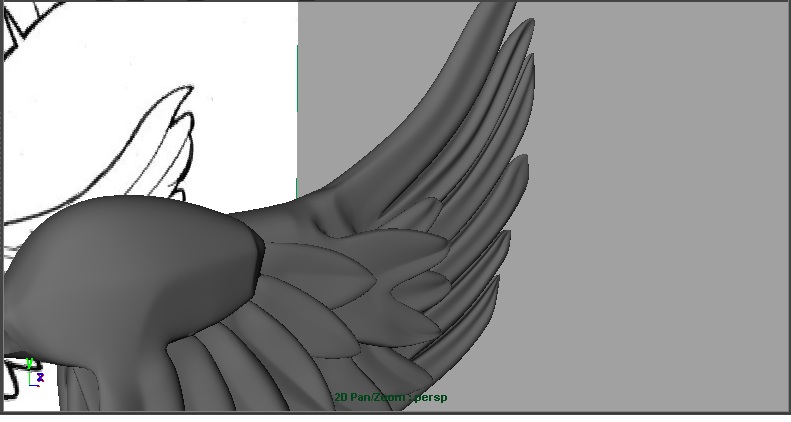
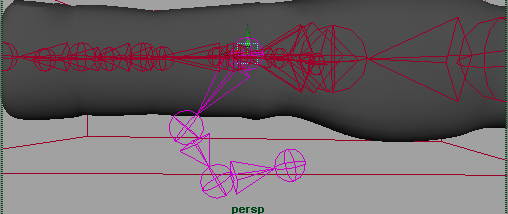
i looked at some reference of how one would rig a wing before i started modelling but soon realised Calum's design was very simplified and would not require all the joints shown above, however, this bird wing reference did come in handy when i was building the more realistically drawn Evil fairy wing: see, below.
 I built the bird wing on 2 layers i started creating a simple cube and manipulating its divisions and overall shape.
 I then extruded faces to make the feathers
 i added topology minimally to achieve the right feather shape
 I built the second layer of the wings the same way

 I rounded the "shoulder" lump
 I added topology to create indented centres and plump sides for the feathers


 Before starting the Evil fairy wing i looked at the bird wing rigging reference (above) and images of bats, as the joint structure is clearly evident through their thin wings.
I started by creating and duplicating 8 cylinders
I shaped them t match the bones in Calum's drawing

I joined them together and added topology to make the spikes seem as if they were pushing out through the flesh surrounding the bone
 I extruded a plane from the edges of the cylinders to create the membrane wing


 The Fairy wing was created using a similar process to the Evil fairy wing
 (once i had created the front/ main wing shape, i duplicated it, deleted the bottom bone i had already built on the base, and attached the duplicate in it's place to save time)
 Before finishing up, i attached all of the wings to the shoulder of the main model in turn to make sure they fitted perfectly, and then kept them as separate objects on their own named layers.

P.S. The inside mouths for all of Waddles' heads are also complete now.

Friday 16 November 2012

Why did I decide to rig the faces again...?

Been rigging the face solidly for the last 2 weeks. And when I say solidly, I mean amongst doing a draft of my D&TM report and doing some work for Fearg Na Mara and Stupid Kow (other class films).

Sometimes it's going well, and sometimes it's a bit of a pain.

We have working jaws, eyebrows and lips, although I haven't done the lip-roll yet, that's next!

Had a bit of bother with the eyes when I tried to rig them, as it turns out the eyeballs aren't perfectly spherical, which is causing them to pop out of the eyelids. Dan's sorting that out as we speak!

At this point I'm completely fed up with following tutorials step for step. Especially since the best ones I can find are for realistic human heads, and that's not what I'm dealing with. 

It really feels like my brain is melting... I keep going between stages of wanting to learn absolutely everything and give the head a million controls, and being fed up and looking for shortcuts.
So I've decided to take a wee break for the sake of my health and work on my dissertation. On Monday I will have a meeting with myself and decide just exactly what I need in the rig, and what bits I can miss out. 


Things we definitely still need set up are the lip-roll and the fleshy eye rig. Also think it may be worth setting up some blend shapes for cheek deformations. Then I just have to build the controls an he's done. 


main face set up (at this stage)


lip control curve with clusters
jaw with weights sorted out


Just have to keep repeating to myself that it'll all be worth it when its done haha. This poor wee model is my learning tool, so he's getting the worst of it. After I've sussed everything out on him it'll be plain sailing for the other characters! (surely...)

Tuesday 13 November 2012

PS: Texture update


His eyebrows and hair will be lighter, but other than that, here he is!

Model and textures by Dan McCance


Monday 12 November 2012

I realise this picture doesn't LOOK impressive...

... but it just took me a good HOUR to paint the weights around his mouth.


Riggers like for moments like this. Aha.

You really dont realise how strange a character looks until you spend an hour inside his head... literally :|

Monday 5 November 2012

Little Girl Model

Model by Sarah Rettie

Hand update!

Added those individual controls for joint rotation. 

I first tried out just creating curves for controls and orient constraining them to the individual joints, but when I did this and Froze the Transformations, the rotate tool on the control didn't line up with the way the joints were rotating, and that would have been awful to work with. If any of that made sense, haha.

So what I've done is just set up more controls with custom attributes. I have grown far too fond of set driven keys! I've given these a bigger range (-50 to 50) to make it easier to get precise adjustments. 


The wee diamondy star things are the joint controls, I've coloured them to match the first controls.


So now, you can curl up the fingers using the initial controls, and then adjust them using these. Or you can fire straight in with these, depends what you're after really. 


(1)- Hand with Pinky Control 01 attribute "Curl" at 5 and (2) with 01 still at 5 and Pinky Control 02 attribute "Rotate Joint 03" at 15.


Riiiiiiiiiiiiig,


The rig continues!

Had a bit of a mishap at the end of last week which resulted in a complete do-over. I won't bore you with what went on, but I think at one point I've opened the wrong saved file to work from, so I completed the rig with the joints in the spine facing all different kinds of wrong ways :/ 

Alas, it's been done again. Few new bits of progress for you too!

We now have a Centre of Gravity control, and working knees and elbows. 

I've also just completed the hand controls!


Typical box round the hand, with little squares attached to control the individual fingers.
Each finger has Custom Attribute "Curl" and "Spread", which do exactly as they say on the tin. The hand control itself has master Curl Fist and Spread Fingers attributes, which are linked to each individual finger's attributes. 


These images show the controls working- 


Index finger with Curl attribute set to 5


Fist with Curl Fist set to 5


Hand with Spread Fingers set at 5


Hopefully I can find a way to mirror these controls across to the right arm, not really up for making them all again, but I fear I may have to haha. Also going to add in small controls for the individual joints of the fingers, for when more specific poses are needed, or to tweak dodgy results.


After the fingers I'll be making the inverse foot system, and then it's on to the face! 


Thanks for reading!